FTP主动模式及被动模式

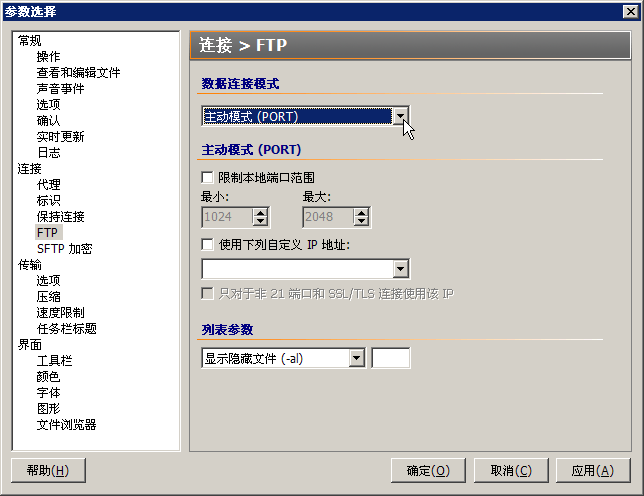
FTP主动模式及被动模式
FTP协议使用双向的多个连接,一般,FTP连接包括:
一个控制连接(control connection)
这个连接用于传递客户端的命令和服务器端对命令的响应。它使用服务器的21端口,生存期是整个FTP会话时间。
几个数据连接(data connection)
这些连接用于传输文件和其它数据,例如:目录列表等。这种连接在需要数据传输时建立,而一旦数据传输完毕就关闭,每次使用的端口也不一定相同。而且,数据连接既可能是客户端发起的,也可能是服务器端发起的。
FTP协议的数据传输存在两种模式:主动模式和被动模式。这两种模式发起连接的方向截然相反,主动模式是从服务器端向客户端发起;被动模式是客户端向服务器端发起连接。

FileZilla (0) FileZilla (1) FileZilla (2) FileZilla (3) FileZilla (4) FileZilla (5) FileZilla (6) FileZilla (7) FlashFXP (0) FlashFXP (1) FlashFXP (2) FlashFXP (3) FlashFXP (4) FlashFXP (5)

PureFTPd 553 无法开启那个文件: Permission denied

PureFTPd 553 无法开启那个文件: Permission denied

一:PureFTPd Web面板中,修改或创建账户的时候,修改UID和GID都为www,或者是其他任何用户和用户组。
二:Root账户登录SSH
#chown -R www /home/wwwroot/wp.zhangfangzhou.cn/
#chgrp -R www /home/wwwroot/wp.zhangfangzhou.cn/
Pureftpd的重启命令:
#/etc/init.d/pureftpd restart
chown(改变文件拥有者)
chgrp(改变文件所属用户组)
chmod(更改文件属性)

PureFTPd (09) PureFTPd (10) PureFTPd (11) PureFTPd (12)

CentOS禁止和打开Ping请求

CentOS禁止和打开Ping请求
打开终端,或通过SSH连接,运行以下命令以禁止Ping请求:
#sysctl -w net.ipv4.icmp_echo_ignore_all=1
#sysctl -p

开启Ping请求:
#sysctl -w net.ipv4.icmp_echo_ignore_all=0
#sysctl -p

0表示允许
1表示禁止

CentOS 重启后失效
Forbidden ping (1) Forbidden ping (2) Forbidden ping (3) Forbidden ping (4) Forbidden ping (5)

Nginx WordPress伪静态rewrite

Nginx WordPress伪静态rewrite

rewrite ^.*/files/(.*)$ /wp-includes/ms-files.php?file=$1 last;
if (!-e $request_filename) {
rewrite ^.+?(/wp-.*) $1 last;
rewrite ^.+?(/.*\.php)$ $1 last;
rewrite ^ /index.php last;
}
将上述代码插入:
(1)/usr/local/nginx/conf/vhosts.conf  (普通)
(2)/usr/local/nginx/conf/vhost/domain.conf    (LNMP http://lnmp.org/)
 server {…} 中,
 重启 nginx(/etc/init.d/nginx restart) 即可生效。

phpStudy (10)

SSH用FTP将服务器上的文件上传到其他服务器

SSH用FTP将服务器上的文件上传到其他服务器

一:检查Linux系统是32位还是64位
getconf LONG_BIT

二:安装FTP客户端

yum install ftp

rpm -Uvh http://mirror.centos.org/centos/6/os/i386/Packages/ftp-0.17-54.el6.i686.rpm
rpm -Uvh http://mirror.centos.org/centos/6/os/x86_64/Packages/ftp-0.17-54.el6.x86_64.rpm
ftp /*启用FTP客户端
open zhangfangzhou.cn /*打开远程服务器
user /*输入用户名
Password: /*输入密码
put FileZilla_3.7.4_win32-setup.exe /public_html/ark.net.cn/Software/FTP/FileZilla_3.7.4_win32-setup.exe /put是上传命令,第
一个FileZilla_3.7.4_win32-setup.exe是本地文件名,第二个是远程文件名。意思就是把本地的FileZilla_3.7.4_win32-setup.exe上传到远
程FTP里,并且命名为FileZilla_3.7.4_win32-setup.exe,这样SSH就可以自己上传了。

SSH FTP (0) SSH FTP (1) SSH FTP (2) SSH FTP (3)

LNMP下实现Discuz 伪静态rewrite

LNMP下实现Discuz 伪静态rewrite(LNMP一键安装包http://www.lnmp.org/)
第一步,修改conf文件,找到站点.conf文件,LNMP在/usr/local/nginx/conf/vhost下
第二步,登陆Discuz后台,全局,SEO设置,全部选中,提交,查看当前的 Rewrite 规则,复制。
第三步,将站点.conf下载到本地编辑,替换include discuz.conf;为刚才复制的Rewrite 规则
第四部,重启LNMP,登陆SSH使用如下命令:/root/lnmp restart

LNMP Discuz (0) LNMP Discuz (1) LNMP Discuz (2) LNMP Discuz (3) LNMP Discuz (4) LNMP Discuz (5)

LNMP下FTP服务器的安装和使用(PureFTPd)

LNMP下FTP服务器的安装和使用(PureFTPd)

(LNMP一键安装包http://www.lnmp.org/)

一:安装PureFTPd
cd lnmp1.0-full
./pureftpd.sh

PureFTPd (0)


二:按提示输入你MySQL的root密码、FTP用户管理面板的密码、MySQL的FTP数据库密码。PureFTPd (1) PureFTPd (2) PureFTPd (3)


三:如果使用的是MySQL 5.5,前面安装完后需要按http://lnmp.org/faq/fix-pureftpd-bug-mysql-55.html修复才可以,如果不能确定版本
执行:/usr/local/mysql/bin/mysql -V 就会显示。

PureFTPd (4)


四:打开http://Domain或IP/ftp/,输入FTP用户管理面板的密码,开始使用。PureFTPd (5) PureFTPd (6) PureFTPd (7)

Windows Server 2003 更改用户密码

Windows Server 2003 更改用户密码

一、Ctrl+Alt+Del回到界面就有更改密码选项。

Windows Server 2003 Change Password(1) Windows Server 2003 Change Password(2)

二、CMD 命令方式
net user 用户名 密码
net user administrator 0(0是密码)
net user admin /add  (添加用户admin)
net user admin 123456  (admin密码设置为123456)
net localgroup administrators admin /add (把admin添加到管理员组中)
net user admin /delete  (删除admin)
如果要修改密码为空,net user administrator ""(两个紧挨着的")

Windows Server 2003 Change Password(3)

三、本地用户和组。

Windows Server 2003 Change Password(4) Windows Server 2003 Change Password(5) Windows Server 2003 Change Password(6)