nginx_upstream_check_module 模块的作用主要是为 Nginx 的 upstream(上游服务器) 提供主动健康检查 和一些负载均衡增强功能。
1、具体来说,它的功能和作用如下:
主动健康检查(Active Health Check)
默认 Nginx 的 upstream 只能被动发现后端宕机(通过连接失败或响应超时)。
安装了 nginx_upstream_check_module 后,可以:
定期向后端服务器发送 HTTP 请求或 TCP 探针。
判断后端服务器是否可用。
动将不可用的服务器标记为 down,从负载均衡池中剔除。
2、支持多种类型:
type=http → 用于 HTTP 服务。
type=https → 用于 HTTPS 服务。
type=tcp → 用于 TCP 服务(非 HTTP)。
interval:检查间隔,例如 `interval=5000` 表示每 5 秒检查一次。
rise:连续成功多少次后,判定节点恢复正常。
fall:连续失败多少次后,判定节点不可用。
timeout:检查请求超时时间(毫秒)。
3、可自定义 HTTP 请求报文。
判断响应状态码是否正常,例如 2xx 或 3xx。
4、设置可用更新源
wget -O /etc/yum.repos.d/epel.repo https://mirrors.aliyun.com/repo/epel-7.repo
wget -4 --no-check-certificate -O /etc/yum.repos.d/CentOS-Base.repo https://www.zhangfangzhou.cn/third/Centos-7.repo
5、下载源码
### Nginx 源码
wget https://nginx.org/download/nginx-1.20.2.tar.gz
tar -zxvf nginx-1.20.2.tar.gz

### zlib(可选,用于数据压缩)
wget http://www.zlib.net/zlib-1.2.13.tar.gz
tar -zxf zlib-1.2.13.tar.gz

### PCRE(支持正则表达式匹配)
wget --no-check-certificate https://ftp.pcre.org/pub/pcre/pcre-8.45.tar.gz
tar -zxf pcre-8.45.tar.gz

### OpenSSL(支持 HTTPS)
wget https://www.openssl.org/source/openssl-1.1.1t.tar.gz
tar -zxf openssl-1.1.1t.tar.gz
mv openssl-1.1.1t openssl

### Sticky 模块
wget https://bitbucket.org/nginx-goodies/nginx-sticky-module-ng/get/08a395c66e42.zip -O sticky.zip
unzip sticky.zip
mv nginx-goodies-nginx-sticky* nginx-sticky

### nginx_upstream_check_module
wget https://github.com/yaoweibin/nginx_upstream_check_module/archive/master.zip -O nginx_upstream_check_module-master.zip
unzip nginx_upstream_check_module-master.zip
6、编译安装
yum -y install libtool
#zlib 是提供数据压缩之用的库 (非必要编译安装)
cd ~
cd zlib-1.2.13
./configure --prefix=/usr/local/zlib
make && make install
echo "/usr/local/zlib/lib" > /etc/ld.so.conf.d/zlib.conf
ldconfig

#pcre PCRE库是一组函数,它们使用与Perl 5相同的语法和语义实现正则表达式模式匹配.(非必要编译安装)
cd ~
sudo yum install gcc-c++ -y
tar -zxf pcre-8.45.tar.gz
cd pcre-8.45
./configure --prefix=/usr/local/pcre --enable-utf8
make && make install
~/pcre-8.45/libtool --finish  /usr/local/pcre/lib/
echo "/usr/local/pcre/lib/" > /etc/ld.so.conf.d/pcre.conf
ldconfig

## 安装 Patch 工具(为 nginx_upstream_check_module 打补丁)
yum install -y patch

ngstable=1.20.2
#Install Nginx
cd ~
yum -y install gzip man
tar -zxf nginx-${ngstable}.tar.gz
#
#Custom nginx name
sed -i 's@^#define NGINX_VER          "nginx/" NGINX_VERSION@#define NGINX_VER          "Microsoft-IIS/10.0/" NGINX_VERSION@g'  ~/nginx-${ngstable}/src/core/nginx.h
sed -i 's@^#define NGINX_VAR          "NGINX"@#define NGINX_VAR          "Microsoft-IIS"@g'  ~/nginx-${ngstable}/src/core/nginx.h
sed -i '30,40s@nginx@Microsoft-IIS@g'  ~/nginx-${ngstable}/src/http/ngx_http_special_response.c
sed -i '45,50s@nginx@Microsoft-IIS@g' ~/nginx-${ngstable}/src/http/ngx_http_header_filter_module.c
#
#Nginx shows the file name length of a static directory file
sed -i 's/^#define NGX_HTTP_AUTOINDEX_PREALLOCATE  50/#define NGX_HTTP_AUTOINDEX_PREALLOCATE  150/'  ~/nginx-${ngstable}/src/http/modules/ngx_http_autoindex_module.c
sed -i 's/^#define NGX_HTTP_AUTOINDEX_NAME_LEN     50/#define NGX_HTTP_AUTOINDEX_NAME_LEN     150/'  ~/nginx-${ngstable}/src/http/modules/ngx_http_autoindex_module.c
#
yum install -y patch
cd ~/nginx-${ngstable}
patch -p1 < ../nginx_upstream_check_module-master/check_1.20.1+.patch
# patch -p1 < ../nginx_upstream_check_module-master/check_1.20.1+.patch
patching file src/http/modules/ngx_http_upstream_hash_module.c
patching file src/http/modules/ngx_http_upstream_ip_hash_module.c
patching file src/http/modules/ngx_http_upstream_least_conn_module.c
patching file src/http/ngx_http_upstream_round_robin.c
patching file src/http/ngx_http_upstream_round_robin.h

#Copy NGINX manual page to /usr/share/man/man8:
cp -f ~/nginx-${ngstable}/man/nginx.8 /usr/share/man/man8
gzip /usr/share/man/man8/nginx.8

cd ~/nginx-${ngstable}
./configure --prefix=/usr/local/nginx --user=www --group=www \
--build=CentOS \
--modules-path=/usr/local/nginx/modules \
--with-openssl=/root/openssl \
--with-pcre=/root/pcre-8.45 \
--with-zlib=/root/zlib-1.2.13 \
--add-module=/root/nginx-sticky \
--add-module=/root/nginx_upstream_check_module-master \
--with-http_stub_status_module \
--with-http_secure_link_module \
--with-threads \
--with-file-aio \
--with-http_v2_module \
--with-http_ssl_module \
--with-http_gzip_static_module \
--with-http_gunzip_module \
--with-http_realip_module \
--with-http_flv_module \
--with-http_mp4_module \
--with-http_sub_module \
--with-http_dav_module \
--with-stream \
--with-stream=dynamic \
--with-stream_ssl_module \
--with-stream_realip_module \
--with-stream_ssl_preread_module
make -j$(nproc)
make install
7、平滑升级nginx
mv /usr/local/nginx/sbin/nginx /usr/local/nginx/sbin/nginx.old

#然后拷贝一份新编译的二进制文件:
cp ~/nginx-${ngstable}/objs/nginx /usr/local/nginx/sbin/

#检测配置
nginx -t
kill -USR2 `cat /var/run/nginx.pid`
kill -HUP `cat /var/run/nginx.pid`
8、修改配置
upstream oah {
sticky; # 会话保持
server 10.53.121.51:8080;
server 10.53.121.52:8080;
server 10.53.121.53:8080;
server 10.53.121.66:8080;
server 10.53.121.67:8080;
# TCP 健康检查,只检测端口是否可用
check interval=5000 rise=2 fall=3 timeout=3000 type=tcp;
}
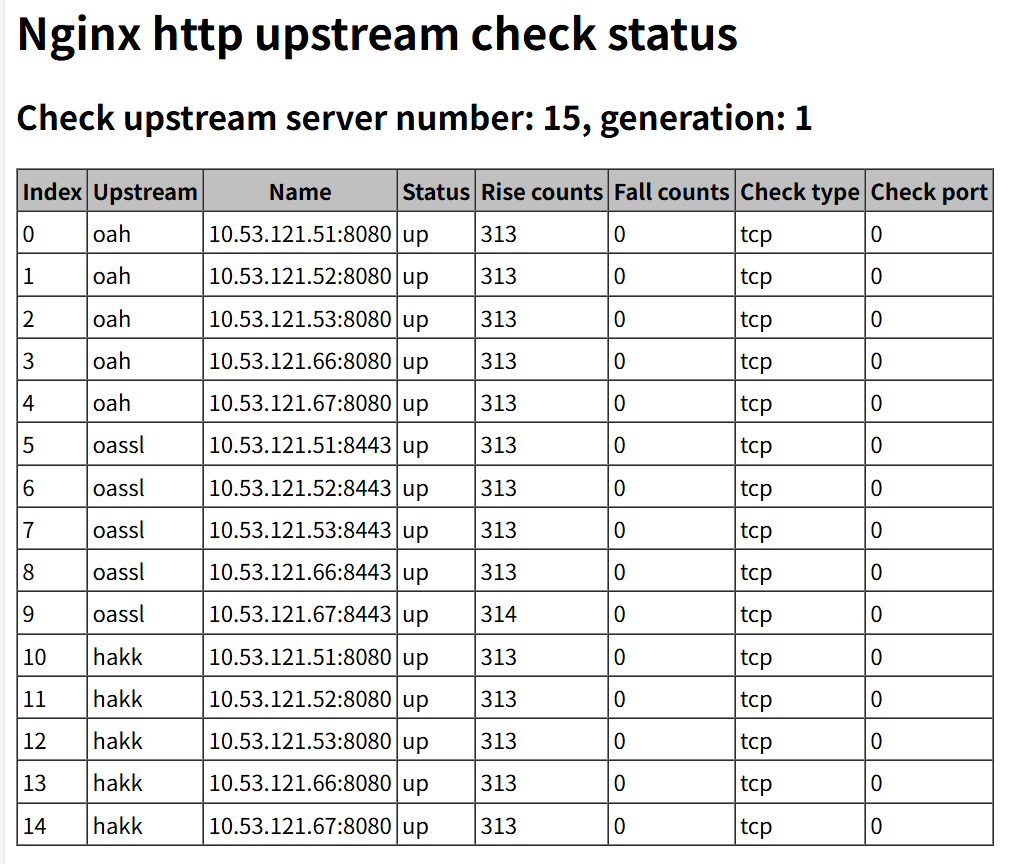
9、添加status页面
location /status {
check_status;
}