如何在 Debian 8 Debian9 安装GNOME桌面环境并使用root登陆GNOME桌面环境

How to Enable GNOME Gui Root Login in Debian 8 Debian 9
如何在 Debian 8 Debian9 安装GNOME桌面环境并使用root登陆GNOME桌面环境

在Debian 9上启用GNOME GUI root访问权限与在Debian 8中启用GNOME GUI root登录非常类似。
使用root帐户是危险的,因为您可以破坏您的整个debian系统。

1、Debian 9 安装 GNOME 桌面环境
apt-get update
apt-get install x-window-system-core -y
apt-get install gnome -y

sudo apt-get install tasksel
或者apt-get install task-gnome-desktop 或者tasksel 选中gnome 或者 tasksel install gnome-desktop --new-install

2、使用root权限登陆终端界面,编辑/etc/gdm3/daemon.conf
vi /etc/gdm3/daemon.conf
在 security 下面添加 AllowRoot=true
保存后退出vi
gdm 是 gnome 的登陆管理器

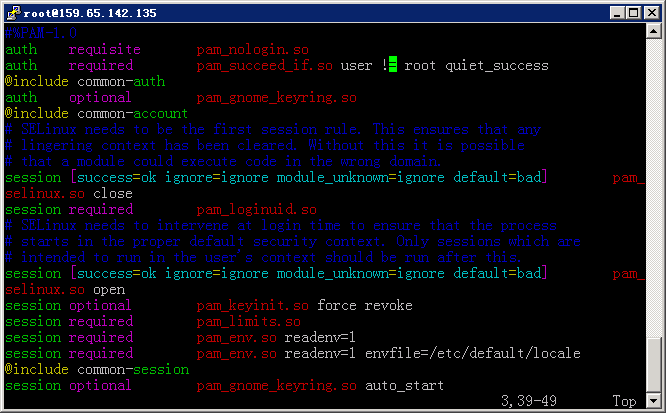
3、使用root权限登陆终端界面,编辑/etc/pam.d/gdm-password
vi /etc/pam.d/gdm-password
注释掉这一行 auth required pam_succeed_if.so user != root quiet_success
#auth required pam_succeed_if.so user != root quiet_success
保存后退出vi

4、重启即可,若无法启动桌面环境 输入startx

在CentOS 7 / RHEL 7 / Fedora 上安装和配置xrdp详细教程

Install xrdp on CentOS 7 / RHEL 7 / Fedora
在CentOS 7 / RHEL 7 / Fedora上安装和配置xrdp详细教程

xrdp is an Open Source Remote desktop Protocol server, which allows you to RDP to your Linux server from Windows machine;
xrdp是一个开源的远程桌面协议服务器,它允许你从Windows使用RDP(Remote Desktop Protocol)远程到你的Linux服务器;

更新系统
yum update -y

安装桌面服务
yum groupinstall "X Window System" "GNOME Desktop" -y
systemctl set-default graphical.target

yum install epel-release -y
yum install xrdp -y

rpm -ql xrdp #查看安装文件
主要配置文件
/etc/xrdp/xrdp.ini
[globals]
bitmap_cache=yes 位图缓存
bitmap_compression=yes 位图压缩
port=3389 监听端口,建议修改成其他端口号

/etc/xrdp/sesman.ini
[Security]
AllowRootLogin=1 允许root登陆
MaxLoginRetry=4 最大重试次数

启动服务
systemctl enable xrdp
systemctl enable xrdp-sesman
systemctl start xrdp-sesman
systemctl start xrdp

设置防火墙
firewall-cmd --permanent --zone=public --add-port=3389/tcp
firewall-cmd --reload

或者
iptables -A INPUT -p tcp --dport 3389 -j ACCEPT
service iptables save;service iptables restart

CentOS 7安装GNOME桌面 和 配置 VNC 服务器

CentOS 7安装GNOME桌面 和 配置 VNC 服务器
这是一个关于怎样在你的 CentOS 7 上安装GNOME桌面 和 配置 VNC 服务器的教程。当然这个教程也适合 RHEL 7 安装GNOME桌面 和 配置 VNC 服务器。

1、安装桌面
yum check-update
yum groupinstall "X Window System" "GNOME Desktop" -y

2、设置默认启动图形界面
unlink /etc/systemd/system/default.target
ln -sf /lib/systemd/system/graphical.target /etc/systemd/system/default.target

3、安装 VNC 服务器
yum install tigervnc-server -y

然后,我们需要在 /etc/systemd/system/ 目录里创建一个配置文件。我们可以将 /lib/systemd/sytem/vncserver@.service 拷贝一份配置文件范例过来。

cp /lib/systemd/system/vncserver@.service /etc/systemd/system/vncserver@:1.service

4、配置VNC服务器
vi /etc/systemd/system/vncserver@:1.service
然后打开这个配置文件/etc/systemd/system/vncserver@:1.service替换掉默认用户名
找到这一行
ExecStart=/sbin/runuser -l -c "/usr/bin/vncserver %i"
PIDFile=/home//.vnc/%H%i.pid
这里我直接用root 用户登录,所以我替换成
ExecStart=/sbin/runuser -l root -c "/usr/bin/vncserver %i"
PIDFile=/root/.vnc/%H%i.pid

5、重加载 systemd
# systemctl daemon-reload

6、VNC设密码
# vncpasswd

7、配置防火墙iptables或者firewalld
vim /etc/sysconfig/iptables
在合适位置加上
-A INPUT -m state --state NEW -m tcp -p tcp --dport 5900:5903 -j ACCEPT
重启iptable
service iptables restart

如果是用Centos 7 默认防火墙的可能需要
# firewall-cmd --permanent --add-service vnc-server
# systemctl restart firewalld.service

8、设默认启动并开启VNC
# systemctl enable vncserver@:1.service
# systemctl start vncserver@:1.service

9、重新启动服务器
reboot

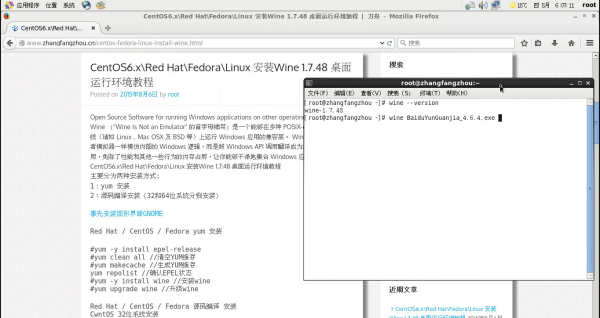
CentOS6.x\Red Hat\Fedora\Linux 安装Wine 1.7.48 桌面运行环境教程

Open Source Software for running Windows applications on other operating systems
Wine (“Wine Is Not an Emulator” 的首字母缩写)是一个能够在多种 POSIX-compliant 操作系统(诸如 Linux,Mac OSX 及 BSD 等)上运行 Windows 应用的兼容层。 Wine 不是像虚拟机或者模拟器一样模仿内部的 Windows 逻辑,而是將 Windows API 调用翻译成为动态的 POSIX 调用,免除了性能和其他一些行为的内存占用,让你能够干净地集合 Windows 应用到你的桌面。
CentOS6.x\Red Hat\Fedora\Linux 安装Wine 1.7.48 桌面运行环境教程
主要分为两种安装方式:
1:yum 安装
2:源码编译安装(32和64位系统分别安装)

事先安装图形界面GNOME

Red Hat / CentOS / Fedora yum 安装

#yum -y install epel-release
#yum clean all //清空YUM缓存
#yum makecache //生成YUM缓存
yum repolist //确认EPEL状态
#yum -y install wine //安装wine
#yum upgrade wine //升级wine

Red Hat / CentOS / Fedora 源码编译 安装
CwntOS 32位系统安装

#yum -y install wget gcc make vim screen bzip2-devel epel-release zlib-devel libxcb-devel
#yum groupinstall "Development tools" -y
#yum clean all //清空YUM缓存
#yum makecache //生成YUM缓存
#yum repolist //确认EPEL状态
#yum -y update
#reboot
#wget http://nchc.dl.sourceforge.net/project/wine/Source/wine-1.7.48.tar.bz2 //下载wine
#tar -jxvf wine-1.7.48.tar.bz2 //解压
#cd wine-1.7.48
#./configure

configure: error: X development files not found. Wine will be built
#yum -y install libX11-devel freetype-devel
#./configure //配置
#make //编译
#make install //安装
#wine xxx.exe //运行32位软件

CentOS 64位系统安装

#yum groupinstall "Development tools" -y
#yum -y install wget gcc make vim screen bzip2-devel epel-release zlib-devel libxcb-devel
#yum -y update
#reboot
#wget http://nchc.dl.sourceforge.net/project/wine/Source/wine-1.7.48.tar.bz2 //下载wine
#tar -jxvf wine-1.7.48.tar.bz2 //解压
#cd wine-1.7.48
#./configure

configure: error: Cannot build a 32-bit program, you need to install 32-bit development libraries.

#./configure --enable-win64 //配置
configure: Finished. Do 'make' to compile Wine.

configure: error: X development files not found. Wine will be built

#yum -y install libX11-devel
#./configure --enable-win64

configure: error: FreeType development files not found. Fonts will not be built.
Use the --without-freetype option if you really want this.
#yum -y install freetype-devel
#./configure --enable-win64
configure: Finished. Do 'make' to compile Wine.
#make //编译
Wine build complete.
#make install //安装
#wine64 xxx.exe //运行64位软件
完成

linux的NetworkManager服务

linux (CentOS)配置IP地址信息,重启后网络配置失效。
经多次查找发现这种是NetworkManager的问题,NetworkManager试图将DHCP中获取的DNS信息写入/etc/resolv.conf,导致原文件被覆盖,
打开/etc/resolv.conf文件 会发现 Crate by networkmanager。

1:在配置文件添加 PEERDNS=no 这个选项可令/etc/resolv.conf 在系统重启后不会被重写,
重新启动后仍任被NetworkManager 重新创建了/etc/resolv.conf,该方法无效。

2:在文件属性中设置i参数避免文件被修改
#chattr +i /etc/resolv.conf

#chattr -i /etc/resolv.conf //如果你要修改此文件,移除i参数
重新启动后仍任被NetworkManager 重新创建了/etc/resolv.conf,该方法无效。

3:关闭该服务。
service NetworkManager stop 临时关闭:
chkconfig NetworkManager off 永久关闭:

关闭后正常

网络管理器最初由 Redhat 公司开发,现在由 GNOME 管理。

为CentOS 6.x安装图形界面GNOME

为CentOS 6.x安装图形界面GNOME、火狐浏览器并用TigerVNC 远程连接

为CentOS 6.6安装图形界面GNOME、火狐浏览器并用TigerVNC 远程连接
GNOME
易用性——设计和创建为所有人所用的桌面和应用程序
国际化——保证桌面和应用程序可以用于很多语言
火狐浏览器
Firefox 全球第三大流行的网页浏览器
VNC
VNC(Virtual Network Computing),为一种使用RFB协议的屏幕画面分享及远程操作软件


准备阶段:
#yum -y install wget gcc make vim screen epel-release
#yum clean all //清空YUM缓存
#yum makecache //生成YUM缓存
#yum repolist //确认EPEL状态
#yum -y update
#reboot

开始安装GNOME:
yum groupinstall "Development tools" -y
yum groupinstall "X Window System" "Desktop" "Chinese Support" "Fonts" -y

groupinstall "Desktop" #CentOS 6.x版本安装GNOME包
groupinstall "GNOME Desktop Environment" #CentOS 5.x版本安装GNOME包

开始安装配置TigerVNC Server:
yum -y install tigervnc-server

接下来设定VNC使用者进入后的环境,vim /etc/sysconfig/vncservers
下面是默认值,修改这里的用户和登入设定,他的值是 "索引号1:用户账号1 索引号2:用户账号2 索引号3:使用者账号3 ...."

索引值就是未来联机用的port号(5900+索引值),例如索引值2 (5900 + 2),所以到时连接 VNC Server 就使用 :5902
# VNCSERVERS="2:myusername"
# VNCSERVERARGS[2]="-geometry 800x600 -nolisten tcp -localhost"

多用户举例

VNCSERVERS="2:root 3:axer"
VNCSERVERARGS[2]="-geometry 1280x1024 -nolisten tcp -localhost"
VNCSERVERARGS[3]="-geometry 1280x1024"

单用户举例
VNCSERVERS="1:root"
VNCSERVERARGS[1]="-geometry 1360x768" //分辨率可以根据实际情况设置

用户必须是存在的

设定VNC的使用者密码
vnc的用户帐密和系统不同,需独立设定,使用指令 vncpasswd,切换到该用户下指令即可:

#vncpasswd
Password:
Verify:
你可能会忘记vnc的密码,只要把自己家目录中的 .vnc/passwd 档删掉然后重新执行 vncpasswd 即可。
#rm ~/.vnc/passwd

多用户务必设定后面中已指定的用户密码,否则在启动vnc会出现这样的错误:
3:axer
VNC password for user axer is not configured
[失败]
启动vnc/停止vnc
#service vncserver start | stop | restart

设定开机启动
#chkconfig --level 35 vncserver on

iptables防火墙
iptables -I INPUT -p tcp --dport 5901 -j ACCEPT
service iptables save
service iptables restart

其他

1. 如果启动时出现错误
正在启动 VNC 服务器:0:root A VNC server is already running as :0
这代表 /etc/sysconfig/vncservers 中有设定 "0"索引值,索引值得从1开始 VNCSERVERS="0:root 1:axer"

2. 查看正在开启的vnc server window
#vncserver -list

TigerVNC server sessions:

X DISPLAY # PROCESS ID
:1 6376
:2 6418

3. 强制关闭其中的显示,例如第2个
#vncserver -kill :2

vim /etc/inittab
id:3:initdefault //将3改为5,id:5:initdefault
系统启动,默认进入文字界面(默认为3);我们要让系统自动进入图形界面(数字5),所以把3改为5。

安装完毕后需要重新启动服务器

CentOS 7.x
#yum -y install wget gcc make vim screen epel-release
#yum clean all //清空YUM缓存
#yum makecache //生成YUM缓存
#yum repolist //确认EPEL状态
#yum -y update
#reboot

yum groupinstall "Development tools" -y
yum groupinstall "GNOME Desktop" -y

开始安装火狐浏览器:
yum -y install wget gcc make epel-release //更新yum源
yum -y install firefox //安装火狐浏览器

安装完毕后需要重新启动计算机或服务器

在CentOS6.x或CentOS7.x上安装EPEL Repo,Extra Packages for Enterprise Linux (EPEL)